8. Autoresponder
E-Mail Marketing Integration
DigiMember is NO autoresponder and no e-mail marketing service! In order to add your members to your respective e-mail marketing service, you can connect your e-mail marketing service provider in DigiMember. For this purpose, appropriate interfaces are available for integration.
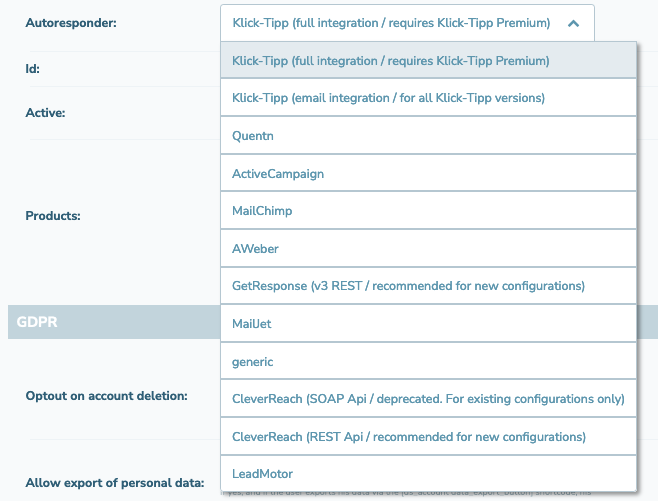
DigiMember has interfaces to the following e-mail marketing systems:
- KlickTipp (full integration API)
- KlickTipp (e-mail integration)
- aWeber
- MailChimp
- Mail jet
- Clever Reach
- GetResponse
- Lead motor
In addition, it is possible to add further providers generically if the corresponding requirements are met by the provider (e.g. server to server notification). Please note that this is only an option for advanced users, usually programming skills are required. We do NOT offer support for the generic connection.
Add Email Marketing Provider
To add an email marketing provider click on "Autoresponder " in the DigiMember menu. Then, at the top of the page, click "Add ". Now select the appropriate provider from the list in the drop-down menu at the top of the page.
After you have selected your provider, a detailed guide will appear, showing you which steps you have to take.
Once you have made all the settings, you can test your settings at the bottom of the page.
Once you have a new member, he or she will automatically be added to your email marketing software. The double opt-in settings are made by your provider.
Connect Mailchimp with DigiMember
In this video we will explain how to connect MailChimp to DigiMember in order to use autoresponders with the email marketing tool MailChimp.
Summary:
- Log in to your WordPress Dashboard and click on DigiMember -> Autoresponder
- Then you click "Add "
- In the drop-down menu at Autoresponder you then select "MailChimp ".
- Then you select for which products the Autoresponder should be set up.
- Then you create a new list in MailChimp, which can later be connected to DigiMember. (Optional)
- Then click on your name in MailChimp in the upper right corner and in the drop-down menu click on "Account".
- There you click on "Extras" and then "API Keys".
- Here you can now click on the "Create A Key" button to create a new API Key.
- Then copy this key and paste it into the DigiMember "MailChimp API Key".
- Then you click on "Apply Change" button.
- Then you can join the newly created MailChimp list. To do so, go to "MailChimp List" at the bottom of the screen and select the newly created list.
- Then click again on "Apply change" and you are done.
Connect KlickTipp with DigiMember
In this video we explain how to connect the email marketing provider KlickTipp to DigiMember and how to set it up correctly.
Summary:
- Log in to your WordPress Dashboard and click on DigiMember -> Autoresponder
- Click on "Add"
- Select KlickTipp as autoresponder in the drop-down menu. If you have at least the premium tarif at KlickTipp, you can select "Klick Tipp (full integration)". Otherwise, please select "KlickTipp (e-mail integration)".
- Select the products that are to be connected with KlickTipp.
- Enter your KlickTipp user name at "KlickTipp user name" Your KlickTipp user name and the appropriate password. Then click on "Apply changes" and save your changes.
- Afterwards you can choose the Double-Opt-In-Process and the appropriate tags.
- Then you should create the Master record fields in KlickTipp, which are needed to be able to use DigiMember data in KlickTipp mails. First create new fields in KlickTipp, then reload the WordPress page with the DigiMember menu and then assign the master record fields to the DigiMember data in the drop-down menus.
- Done.
Autojoin function with Klick-tipp and DigiMember
In this video we will explain how to use the Autojoin function of DigiMember in combination with KlickTipp so that new email subscribers are automatically added to your member area or product and get an account.
Summary:
Create an empty "Thank you for your registration" page in WordPress and copy the link into your cache (CTRL + C or right click -> Copy).
- Create a new KlickTipp form which you can embed on any page of your WordPress website.
- Create a suitable double opt-in process in KlickTipp, which you assign to the form you just created. Be sure to check the box "Use own thank you page".
- Insert the just copied link of your thank you page at "URL of the thank you page " (CTRL + V).
- Then place the checks at "Append contact ID to URL" and "Append e-mail address to URL ". Then save the new double opt-in process.
- Then edit your Thank You page in WordPress and click the DigiMember icon.
- Select the Shortcode "ds _ autojoin ". At Autoresponder please select KlickTipp and check the products you want to assign.
- Then click on "OK" and adjust the placeholder texts.
- Then you can update your thank you page.
- Done.
You can also find more information and valuable tips about the Autojoin function in the Klick-Tipp Manual
Autologin function with Klick-tipp and DigiMember
In this video we explain how you can set up new entries in a KlickTipp form to be automatically logged into your protected area after they have entered their e-mail address.
Summary:
- Prerequisite: Connection of KlickTipp with DigiMember. See the following video: LINK TO POST
- Further requirement: Autojoin process successfully set up. See the following video: LINK TO POST
- Go to the thank you page, which is displayed after registration in the KlickTipp form. Remove the section with the shortcode for Autojoin.Click on the DigiMember icon and select the shortcode "ds _ autologin "
- **Select the autoresponder ClickTip and the products to be assigned.
- Place the check mark next to "autologin ".
- Click on "OK" and adapt the placeholder texts.
- Update / save your thank you page.
- Done.
For further hints and tips about the Autologin with Klick-Tipp and DigiMember please watch this detailed video in the Klick-Tipp Manual
Connect GetResponce with DigiMember
In this video we explain how you connect DigiMember with the email marketing provider GetResponse.
Summary:
- Prerequisite: A GetResponse account.
- Log in to your WordPress dashboard and go to DigiMember -> Autoresponder.
- Then click on the "Add" button.
- Then select -> GetResponse from the drop-down list at "Autoresponder".
- Log in to your GetResponse account and click on your account picture in the top right corner to open the menu.
- There select "Integrations & API".
- Then click on "API".
- Then click on "Generate **API key".
- Give the API key a name. Attention: Only lower case letters are allowed.
- Click on "generate".
- Now copy the generated API key into the corresponding text field "GetResponse API Key " in the DigiMember menu.
- Click on "Save change" at the bottom.
- Then select the appropriate GetResponse campaign or the appropriate list in the drop-down menu.
- If necessary, select additional user-defined fields that you want to connect with GetResponse. To do so, you must create new custom fields in GetResponse and give them the same name as in the text fields in the DigiMember menu.
- Click on "Save change".
- Done.
Connect ActiveCampaign to DigiMember
In this video we will explain how to connect DigiMember to the email marketing provider ActiveCampaign.
Summary:
- Prerequisite: An ActiveCampaign account.
- Log in to your WordPress dashboard and go to DigiMember -> Autoresponder.
- Then click on the "Add" button.
- Then select -> ActiveCampaign from the drop-down list at "Autoresponder".
- Log in to your ActiveCampaign account and click on Settings -> Developer.
- At "API Access" you will find the URL and Key which you can copy to DigiMember.
- Click on "Apply change" at the bottom.
- Create a new list in ActiveCampaign.
- Refresh the DigiMember settings page or click "Save change".
- Then select the list in ActiveCampaign list.
- Optionally add more tags or remove a tag.
- Select any custom fields you want to associate with ActiveCampaign. You will need to create new custom fields in ActiveCampaign and give them the same name as the text fields in the DigiMember menu.
- Click on "Save change".
- Done.