15. Shortcodes
General information about shortcodes
Summary
- Log in to your WordPress Dashboard and click on DigiMember -> Shortcodes
- Then you see a list of all possible shortcuts you can use on your WordPress page. All shortcodes serve a different purpose. You can read the respective shortcode and its function in the list.
- To use one of the shortcodes, you have to edit an existing page or create a new WordPress page and click on the DigiMember symbol in the editor.
- A popup will then appear in which you can include the respective shortcode using the drop-down menu.
- If you save and publish the page, the shortcode will be replaced by the desired information or form and displayed. In the video we use the Change Account Information form.
- You can repeat this process with all shortcodes that make sense for your product.
- Done.
Shortcodes are used to be able to output certain parts of a program in a variable way. Here you can see an overview of the current shortcuts (explanations will follow):
Shortcuts are calls of certain program functions. In many cases a flexible integration of contents without advanced programming knowledge is important. This is realized by using the different shortcodes.
Shortcodes can be integrated in two ways at the required places in the content field of the respective page.
copy & paste the respective shortcode and change the additional information (via the adminstarion - shortcodes, see also next point)
in the formatting area above the content field the DigiMember Add Shortcode button can be used to configure and integrate the desired button. Make sure that the cursor is positioned correctly.

When using the shortcuts, make sure that all information is given as in the examples below.
The most frequently used shortcuts are
Functions of the different shortcodes
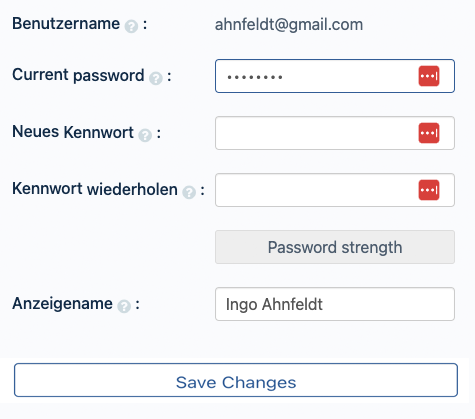
Account
ds_account
Allows a user to change his display name and password.
- Log in to your WordPress dashboard and create a new WordPress page, which you call, for example, "Change account data".
- Click on the DigiMember-Icon and select the shortcode "ds account ".
- There you can optionally check the boxes for "Hide display name", "Export data" and "Delete account" if you want to offer the user the possibility to do so.
- Publish this page.
- Done.
ds_login
Login box in which the user enters his user name and password.
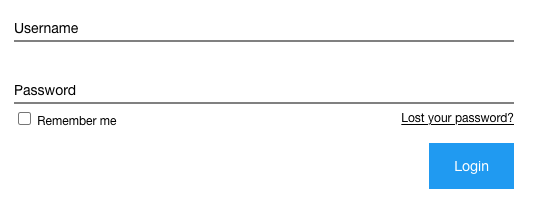
If the user is already logged in and the shortcode should still be displayed, it looks like this:

ds_logout
Performs a logout.
[ds_logout]
After logout the user remains on the current page. This means that you can set content to the page with the ds_logout short code. If the user is already logged out and sees the page, the -shortcode is removed and the content is displayed.
[ds_logout page=123]
After the logout the user will be redirected to the WordPress page with the given Id, e.g. 123.
[ds_logout url=/some_url]
After the logout, the user is redirected to the specified URL, e.g. /some_url. This parameter is ignored if the parameter "page" was specified.
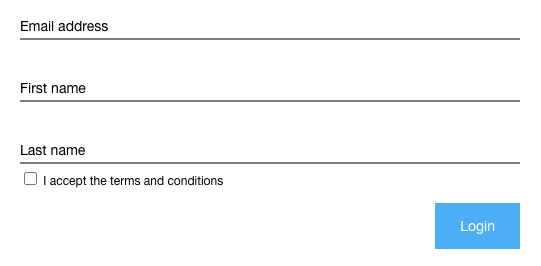
ds_signup
Registration form - new users receive a product
Hint: If you want to use Google reCAPTCHA please use V2, since V3 is currently not working with DigiMember.
ds_subscriptions
Displays checkboxes that allow the user to manage his or her consent to e-mail messages and Web push messages.
ds_webpush
Allows the user to order Web Push messages - see DigiMember - Web Push Messages, tab Settings
User data
ds_email
Shows the e-mail address of the user. For DigiMember this is usually (but not always) also the username.
ds_firstname
Shows the first name of the current user. In this video we explain how you can address your customers personally in your member area, for example.
Summary:
- Log in to your WordPress dashboard.
- Go to a page of your member area or a product page where you want to address the customer personally.
- Use the DigiMember Icon in the WordPress menu to insert a Shortcode such as %%firstname%%% which shows the first name of the currently logged in user in the place of the placeholder.
- Click on "Update" or "Publish" (if it is a new page).
- Done.
ds_lastname
Shows the last name of the current user
ds_loginkey
Shows the login key of the current user. Add the key as a GET parameter digilogin to a URL to enable autologin.
ds_password
Displays the password of the current user, if the password was generated by DigiMember and the user has not changed it yet.
ds_username
Shows the login name of the current user
Course
ds_exam
Display the exam. The previously created exam is displayed on one page. (Select exam in the shortcut options!)
ds_exam_certificate
Displays the download area for an exam certificate. (Select certificate in the shortcut options!)
Further information about the exam and the certificates can be found here.
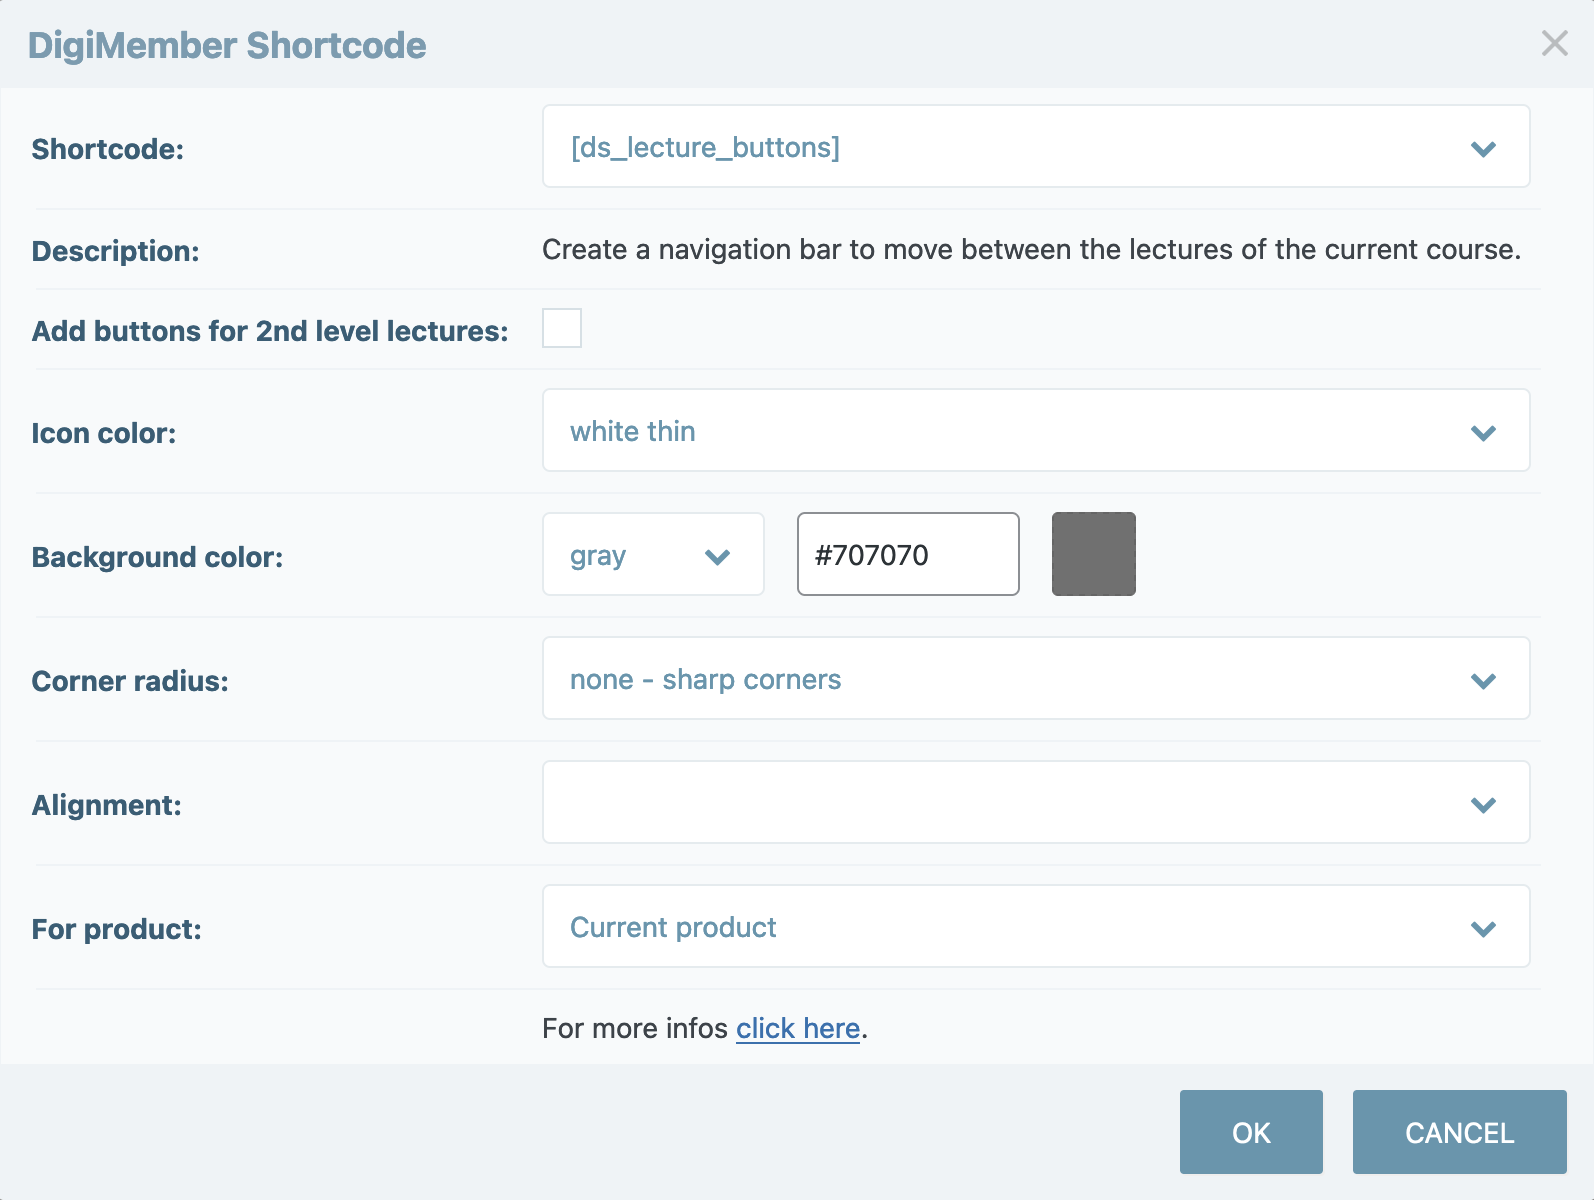
ds_lecture_buttons
Creates navigation buttons to move between lessons in the course. Customize the design

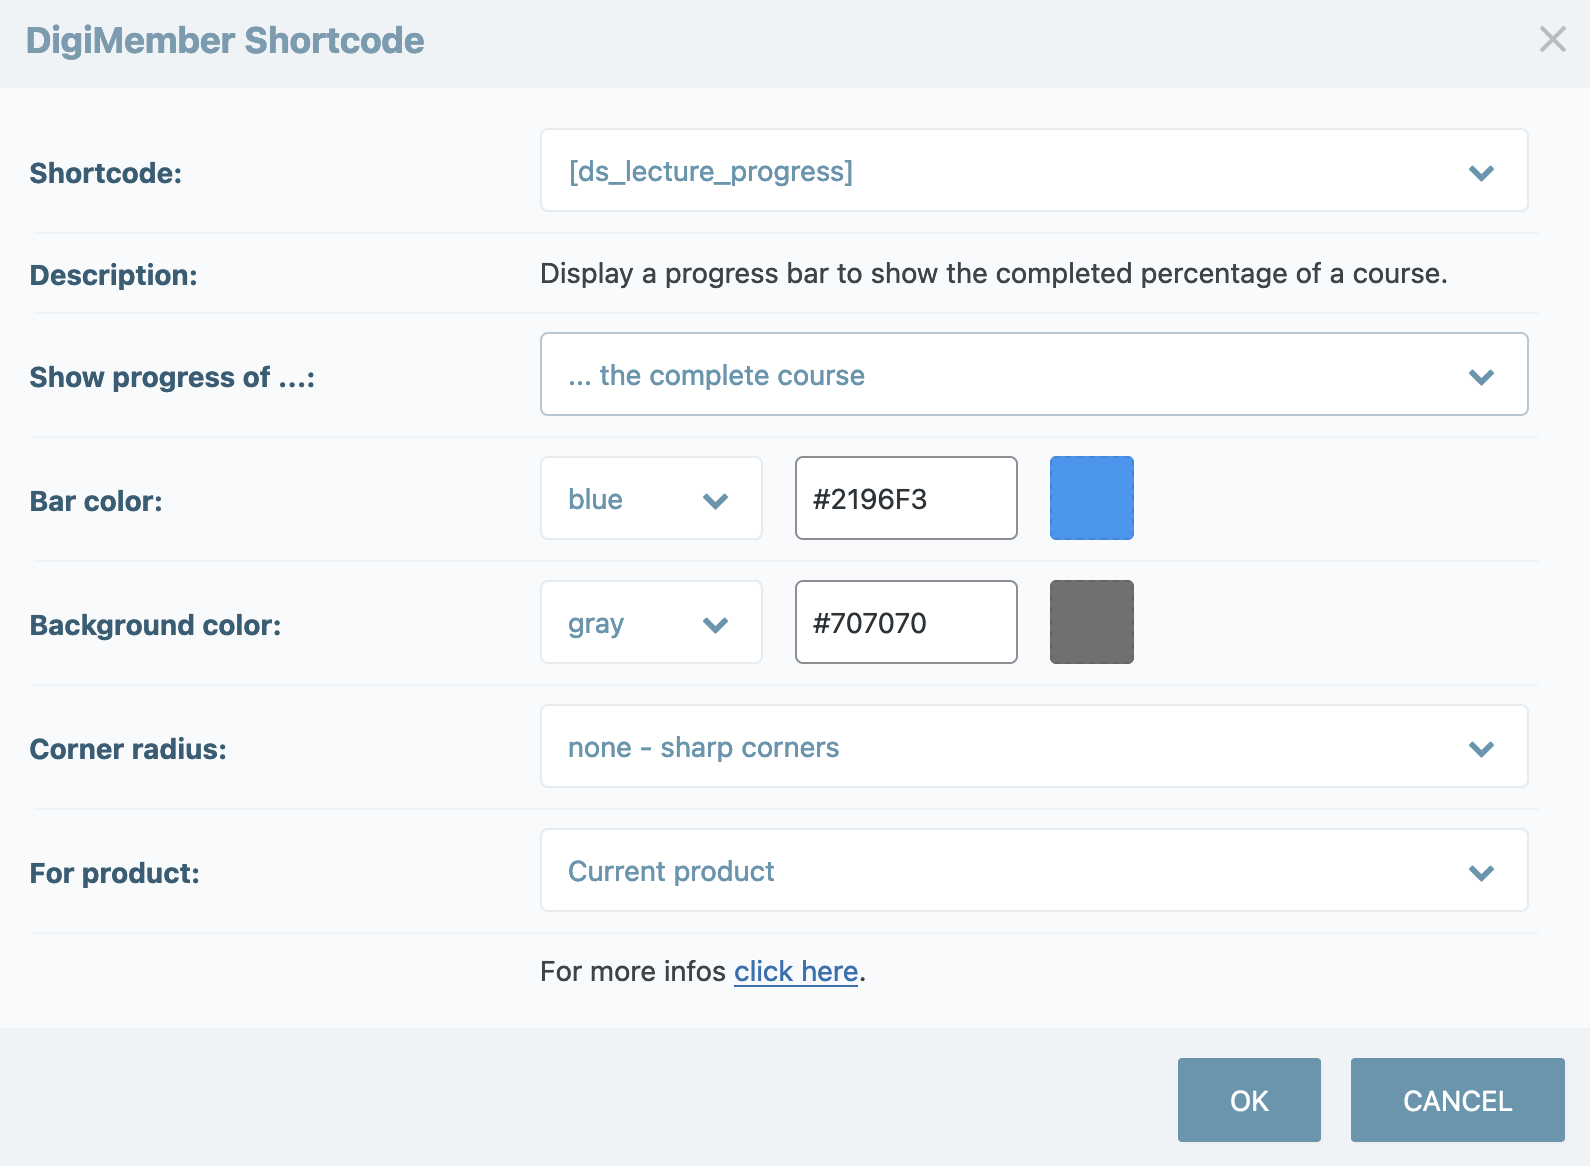
ds_lecture_progress
Shows a progress bar for the current rate. The design can be customized

ds_menu
Displays a menu in the contents area. (Select menu and menu depth in the shortcut options!)
Products
ds_autojoin
Add this shortcode to the thank-you page of your autoresponder. Then a user account for the new contact will be created automatically.
You can find more information about the auto-join process with KlickTipp here.
More hints how to transfer DigiMember user fields from Digistore24 to Klick-Tipp can be found this tutorial.
ds_days_left
Time the number of days the user still has access to the product (if the access period is limited).
[ds_days_left product=123]
Displays the number of days remaining for the product with ID 123.
ds_give_product
Gives a product to a logged-in user. If you want a text to be displayed after giving it, write it between the two shortcode tags [give_product ...] and [/give_product].
ds_op_locked_hint
If a page was created with the live editor of OptimizePress2 or OptimizePress3: Use this shortcode to indicate that a page is locked and will be unlocked later.
ds_op_show_always
If a page was created with the live editor of OptimizePress2 or OptimizePress3: Use this shortcode to always display the content of the element. This is useful for headlines, for example.
ds_products
List of products that the user has purchased. In this video we explain how to create a product overview page with DigiMember, where your customers can see and reach all their purchased products.
summary:
- Log in to your WordPress dashboard and create a new WordPress page, which you call e.g. "product overview page".
- Click on the DigiMember-Shortcode-Icon.
- Select the shortcode "ds_products " and click OK. *Publish your new WordPress page.
- Distribute this page to your customers, so your customers can see and reach all their purchased products at a glance.
- Done.
Sell
ds_add_package
Inserts a sales URL for Digistore24, where the user can book or cancel packages for it (if Digistore is configured in the product or its addons that the quantity can be changed after the purchase).
ds_buyer_to_affiliate
Displays a link for your members to become affiliates in Digistore24. Create a Customer-to-Affiliates program in Digistore24. If the user here in DigiMember has no suitable order, this shortcode will be hidden.
ds_buyers_affiliate_name
Returns the Digistore24 affiliate name that the current user already has or will receive when they join your Digistore24 customer-to-affiliate program. This short code is intended for user accounts created by Digistore24 (through an order or a new affiliate partnership).
ds_counter
Social Proof Counter - shows the number of sales
ds_invoices
Shows a list of all Digistore24 invoices of the currently logged in user. Or nothing, if the user has no Digistore24 orders.
Test payments always have the invoice number 1 - a real invoice number is not assigned for test payments.
ds_receipt
Display the order confirmation URL of Digistore24. The user can use this URL to download his PDF invoices.
ds_renew
Display a reactivation URL of Digistore24. The user can change his payment details via this URL.
ds_upgrade
Shows the URL to an upgrade order page of Digistore24 You set up the upgrade in Digistore24. There you will get an upgrade ID like 1234-A1b2C3d4E5f6 (or the complete shortcode)
Shooters
ds_download
Adds a protected download link to the page. The original URL remains secret.
ds_downloads_left
Shows how many times the user can still call the URL - e.g. "5" if the user is allowed to call the URL five more times. Or "0", if no more calls are possible.
ds_if
Displays content based on conditions. In this video we explain how you can cleverly offer your existing customers additional products by using the shortcode "ds_if" to display certain texts only to non-buyers.
summary:
*Login to your WordPress dashboard and navigate to the WordPress page with the product overview.
- Click on the DigiMember-ShortCode-Icon and select the shortcode "ds_if ".
- select in the popup the condition under which the content should appear between the shortcode Example: Customer has already bought member product 1 but not yet member product 2, then the content between the "ds_if" shortcode will only be displayed under this condition.
- Add the placeholder text between the "ds_if" shortcodes. Promote here the product the customer should buy and link the appropriate sales or information page. *Update the WordPress page.
- Done.
ds_preview
For protected content: Indicates the end of the free preview. Protected content below this shortcut remains protected.
In this video we will explain how you can preview protected content for unlogged users to give them a taste of your member area.
Summary:
- Log in to your WordPress dashboard and navigate to a page where you want to preview the content. Of course you can also create a completely new page.
- Use the DigiMember-Icon in the WordPress menu to add the shortcode "ds_preview " at the point ** where you want your content to be visible only to logged-in users (buyers).
- Update or publish the page.
- Done.
ds_digistore_download
If you are using the Digistore24 download safe: With this shortcode you add links to the user's files in the Download Vault.
ds_waiver_declaration
Ask for waiver of right of withdrawal. A text template with a waiver of the right of revocation is created. The text of this template can NOT be changed.